The Rules Manager enables you to perform various operations relating to rules such as creating, editing, deleting, making copies of rules, sharing, enabling or disabling rules, enabling or disabling the Rule Log, validating a rule, specifying a rule name in different languages, re-ordering rules, and viewing the Rule Log. You can also preview the description of a rule selected in the Table View.
To view the Rules Manager, click the Rules node in the Navigation pane of Business Administrator.
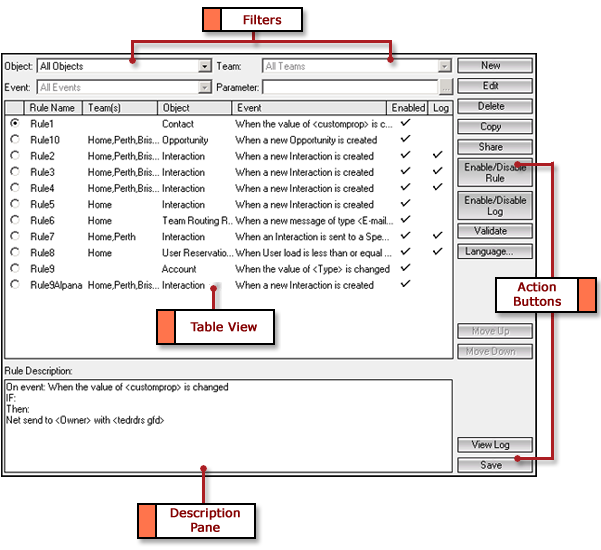
Components of the Rules Manager
The following table describes the components of the Rules Manager:
| Component | Description |
|---|---|
| Filters | The Object, Team, Event, and Parameter fields enable you to locate rules. Specify values in one or more of these fields to locate a rule. • Object list: Select an object based on which you want to search for a rule or select the All Objects option to list all rules configured in the CampusNexus CRM. Select Team Routing Rule, User Assignment Rule, or User Reservation Rule to create the relevant rule. • Team list: Select a team based on which you want to search for a rule. Select the All Teams option to view rules configured for all teams in CampusNexus CRM. The Team list is disabled if you have selected a Global object or the All Objects option in the Object list. • Event list: Select an event based on which you want to search for a rule. Select the All Events option to view rules based on all events available for the selected object and shared with the selected team. The Event list is disabled if you have selected the All Objects option in the Object list. • Parameter: Select a parameter for an event that requires a parameter to be defined, based on which you want to search for a rule. For example, if you have selected the "When the value of <Property> is changed" event for the interaction object, select a property in the Select Interaction Property dialog box, after clicking |
| Table View | Displays all rules that satisfy the search conditions you have defined in the search fields. The following details are displayed for all rules in the Rules Manager: Rule Name, Teams, Object, Event, Enabled, and Log. |
| Rule Description | Displays the description of the selected rule in the Table View. |
| Action Buttons | You can perform various actions on a selected rule in the Rules Manager by clicking the following buttons: • New - Enables you to create a new rule in the New Rule wizard. • Edit - Enables you to modify a rule in the Edit Rule wizard. • Delete - Enables you to delete a rule. • Copy - Enables you to copy a team-based rule to the selected teams. • Share - Enables you to share a rule with various teams. You can also remove teams with which you have shared a rule. • Enable/Disable Rule - Enables you to enable or disable a rule. • Enable/Disable Log - Enables you to enable or disable logging for a rule. • Validate - Enables you to validate a rule. • Language - Enables you to specify the name of a rule in different languages. • Move Up - Enables you to move a rule up in the sequence in which it must be fired. • Move Down - Enables you to move a rule down in the sequence in which it must be triggered. • View Log - Enables you to view the Rule Log for all objects, a selected rule, or a selected object. • Save - Enables you to save modifications to the order in which rules must be fired. |
 . This property is the parameter used in the rule.
The Rule Log Manager
You can view the Rule Log for a selected rule by clicking the View Log button in the Rules Manager. For more information, see Working with the Rule Log.
Note
You can also view the Rules Manager by selecting the Teams node, selecting a specific team, and clicking the Rules button. The Rules Manager displays the rules created for the selected team.